Your Guide to Switching from Incandescent to LED
From Halogen to LED
The transition to LED lighting goes beyond a mere trend; it’s a significant move towards more energy-efficient and cost-effective lighting solutions.
LEDs stand out for their remarkable longevity, reduced energy consumption, and minimal environmental footprint, making them the go-to choice for domestic and commercial settings. Embracing LED technology signifies a step towards sustainable living, a commitment to reducing energy costs and environmental impact.
Common fittings include screw-in E27 and two-pin GU10.
Lumens tell you how bright the replacement will be.
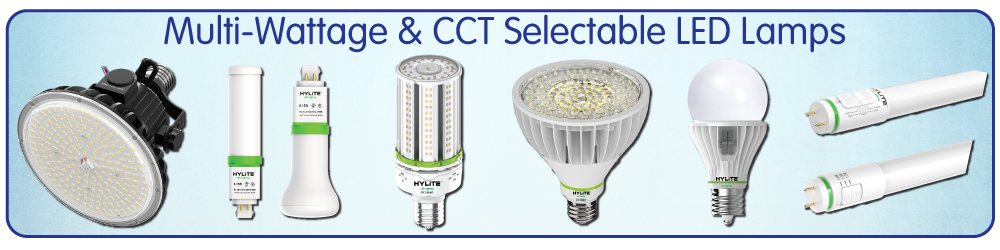
HyLite LED products include dimmable options for retrofit applications.
Compare Watts by Brightness
When choosing an LED replacement, start by matching brightness in lumens rather than trying to match wattage exactly.
| Type of Bulb | 200-300 Lumens | 300-500 Lumens | 500-700 Lumens | 700-1000 Lumens |
|---|---|---|---|---|
| Incandescent | 25-30 watts | 40 watts | 60 watts | 75 watts |
| Halogen | 18-25 watts | 35 watts | 50 watts | 65 watts |
| CFL | 5-6 watts | 8 watts | 11 watts | 15 watts |
| LED | 2-4 watts | 3-5 watts | 5-7 watts | 8-10 watts |
Step-by-Step Guide to Replacing Your Bulbs
Replacing your incandescent or halogen bulbs with LED alternatives is straightforward, yet it requires careful attention to ensure it’s done safely and effectively. Here’s a more detailed step-by-step guide to help you through the process:
The first and most crucial step is to ensure your safety. Before you begin any work, switch off the power to the light fixture you are working on. This is a necessary precaution to avoid any electrical hazards.
If you are replacing halogen bulbs, it’s important to give them sufficient time to cool down after turning off the power. Halogen bulbs can get extremely hot during operation, and handling them too soon can result in burns.
Once the bulb is cool enough to handle, gently unscrew or pull it out from the fixture. The approach depends on the type of bulb and fitting. For screw-in bulbs, rotate them counterclockwise. For bulbs that fit into place, gently pull them straight out. Take care to handle the bulb gently to avoid breakage.
After removing the bulb, take a moment to examine its base. This step is essential in determining the type of fitting your light fixture has. Common types are E27 (screw type) and GU10 (pin type). Identifying the correct fitting type is crucial for selecting the appropriate LED replacement.
Once you have determined the fitting type, it’s time to install it. Carefully align the bulb with the socket – for screw-in types, insert and rotate clockwise; for pin types, align the bulb with the holes and push it in gently until it’s secure. Ensure the bulb is firmly in place, but avoid over-tightening, as this can damage both the bulb and the fixture.
After the LED bulb is securely installed, turn the power back on and test the bulb. This will confirm that the bulb is working properly and is correctly installed.
Watch the Replacement Process
We encourage you to explore this process in depth and witness the transformation firsthand. For a visual walkthrough, check out this video!
Choosing the Right LED Bulbs
When choosing an LED bulb, consider its brightness, which is best measured in lumens rather than watts.
A higher lumen count means a brighter light. Another key factor is the color temperature of the LEDs, which affects a room’s ambiance. LEDs range from warm, yellowish hues to cool, blue tones, measured in Kelvin (K). Also, consider the bulb’s beam angle, which determines the spread of light.
Dimmability and Compatibility
Our LED bulbs stand out for being 100% Triac dimmable, ensuring seamless compatibility with a wide range of dimming switches.
Special Considerations for 12V Bulbs
Replacing 12V halogen bulbs with LED variants might require additional considerations. The key factor here is the compatibility of the transformer used in your 12V system with LED bulbs. Since LED bulbs draw much less power, some older transformers might not be effective with them.
Fortunately, some LED bulbs are designed for direct replacement, meaning no additional adjustments to your current setup are needed.
Color Temperature and Ambiance
The color temperature of the light bulbs can significantly influence a room’s ambiance.
For a warm, cozy ambiance, a bulb with a lower Kelvin rating emitting a warm white light is ideal for living rooms and bedrooms. Conversely, for spaces that require focus and clarity, such as kitchens, bathrooms, and workspaces, a bulb with a higher Kelvin rating, emitting cool white light, would be preferable.
Recommended HyLite Products & Resources
 Lotus Lamp
Ready To Buy?
By understanding the nuances of LED technology, from the types of bulbs and their fittings to the specifics of color temperature and dimmability, you can make an informed decision that benefits your wallet and the environment. Embrace the efficiency and brilliance of LED lighting and illuminate your space with a sustainable and stylish choice.
Halogen to LED FAQs
Can I replace halogen bulbs with LED bulbs?
In many cases, yes. The correct replacement depends on the bulb fitting, voltage, fixture type, wattage, dimming setup, and application.
Should I compare LED bulbs by watts or lumens?
Lumens are the best way to compare brightness. Watts measure energy use, while lumens tell you how much light the bulb produces.
Are LED bulbs dimmable?
Some LED bulbs are dimmable, and some are not. HyLite LED offers dimmable LED retrofit options, including products compatible with Triac dimming.
What should I check before replacing a 12V halogen bulb?
Check whether the transformer is compatible with LED bulbs. Because LEDs draw less power, some older transformers may not work properly with LED replacements.
Can HyLite help me choose the right LED replacement?
Yes. HyLite can help review your lamp type, fixture details, dimming setup, quantity, and application to recommend an appropriate LED replacement or retrofit product.