50% vs. 10% Cutoff
Beam angle measures to 50% of peak intensity; field angle accounts for the broader 10% perimeter spill.
IES Outdoor Types
Types I through V classifications define forward throw and lateral spread for site, roadway, and area lighting.
Photometric Testing
Polar intensity curves and cd/klm data determine actual footcandles across targeted working planes.
Optical Pairing
Lamp output interacts directly with existing reflectors—distribution cannot be judged by wattage alone.
Describe the Pattern the Space Needs
A shelving face, a floor, a workbench, and a person on a platform present different lighting tasks. Record the target's dimensions, its position relative to the fixture, and the current problem: dark gaps, a small bright spot, light on a projection screen, or uncomfortable glare.
| Pattern | General Behavior | Selection Question |
|---|---|---|
| Narrow Directional | Concentrates light around an aiming direction. | Does it cover the whole target without leaving an overly bright center or dark edges? |
| Wide Directional | Spreads light over a larger angular region. | Is there enough light at the target, and where does the spill fall? |
| Omnidirectional | Emits light around the lamp in many directions. | How will the fixture's reflector, lens, and housing redirect or block it? |
| Asymmetric | Distributes light differently in different directions. | Is the fixture oriented to place the intended part of the pattern on the target? |

These descriptions are useful for narrowing the options. Compare the actual angular data rather than assuming that labels such as spot or flood mean the same beam on every product.
Read Beam Angle and Field Angle on the Same Basis
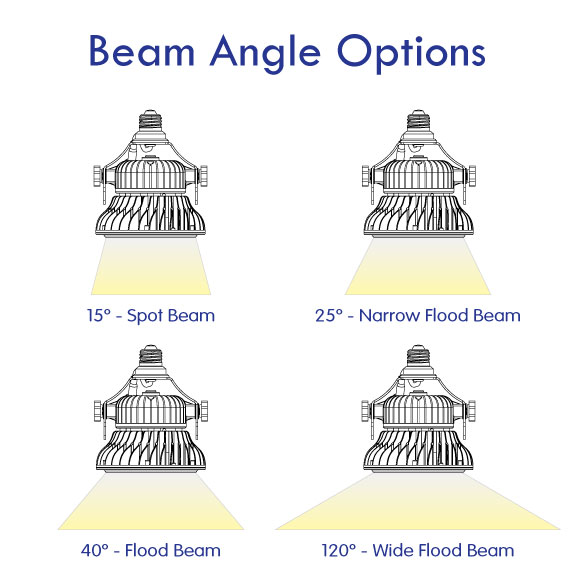
The IES beam-angle definition uses the two directions where intensity falls to 50% of the maximum, measured through the nominal beam centerline. Its field-angle definition uses 10% of maximum intensity and describes more of the weaker light around the beam.
These percentages describe directional intensity. They do not state how much of the lamp's total lumens is contained inside the angle, and they do not mean that light stops at that boundary.
For a beam that is not circularly symmetric, the manufacturer may give angles in two perpendicular planes. An elongated pattern can change substantially when the lamp or optic is rotated. Check the measurement convention and orientation when comparing two specifications.
Consider Distance, Aiming, and the Existing Fixture
Use the distance from the light source to the surface being illuminated. The height above a floor is different from the distance to a raised stage, countertop, or wall display. Moving the same beam farther from a surface generally enlarges its footprint and lowers illuminance; aiming it at an angle changes both the shape and the distances across that footprint.
The host fixture also matters. A replacement lamp's emitter size and position can interact differently with an existing reflector or lens. An omnidirectional LED lamp does not necessarily reproduce the distribution of the HID or CFL lamp it replaces, even if the socket and overall dimensions match.
Review the bare lamp and the installed combination separately. A bright lamp in a poorly matched optical system may still leave the working area unevenly lit.
Use Photometric Information to Compare the Installed Result
Check Tested Configuration
An IES photometric file supplies distribution data for lighting calculations. Its catalog number, optics, output setting, and test description should represent the product being considered. Establish whether it describes a bare lamp or a complete luminaire before using it for a retrofit layout.
Intensity vs. Illuminance
A polar intensity chart shows light emitted in different directions (in candela or cd/klm). An illuminance plot instead shows light arriving across a specified surface (in lux or footcandles). Fagerhult's measurement guide illustrates these chart types.
Review the Whole Area
Look at the low readings between fixtures and near the edges as well as the average. Include important vertical surfaces, such as shelves or faces, where the task requires them. A floor-level average cannot describe all of those conditions.
Outdoor IES Distribution Types
Roadway and area-lighting classifications describe the luminaire's distribution relative to its mounting position. They use photometric criteria, including the location of the half-maximum intensity trace for Types I–IV; they are not substitutes for a project's lighting calculation.
| Classification | General Distinction |
|---|---|
| Type I | A relatively narrow lateral distribution extending along the illuminated area. |
| Types II, III, and IV | Successive classifications with greater street-side lateral reach under the mounting-height-based classification method. |
| Type V | A distribution with essentially circular symmetry around the vertical axis. |
| Type VS | A separate, approximately square-pattern classification assessed using light balance across eight horizontal sectors. |
AGi32's photometric reporting documentation explains the classification criteria. These outdoor types describe a different property from a directional PAR lamp's beam angle. Neither label by itself determines fixture spacing, uniformity, or light levels at a site.
Check the Layout From the Positions People Use
Sanctuaries, Stages & Presentation Areas
Assess light on the intended subjects and from occupied seating. Check whether a wider beam also reaches screens, walls, or the audience.
Warehouses & Storage Areas
Review aisle floors and shelving faces, including shadows from racks, equipment, and stored material.
Outdoor Areas
Evaluate coverage at the edges, light behind the fixture, and spill toward nearby windows or properties. Fixture position and aiming affect the result.
Multiple Fixtures
Assess the overlap between patterns. Increasing output can leave the same bright spots and dark gaps if the distribution or spacing remains unsuitable.
Where a representative installation is evaluated, record the exact lamp, fixture, beam configuration, output setting, and aiming. Compare light readings at the same locations and heights under comparable daylight and operating conditions. Review direct and reflected glare from normal viewing positions as well as the meter readings.
Match the Lighting Pattern to the HyLite Product
For Lotus PAR retrofits, select the beam configuration for the target size and throw distance, then review fixture fit and controls. Selectable wattage or CCT does not, by itself, mean that the beam angle is adjustable.
For HID replacement lamps, include the existing reflector, lens, lamp orientation, and housing in the review. Electrical, thermal, and physical compatibility remain separate requirements from the desired light pattern.
Review the current product documents and contact HyLite with the fixture information, mounting dimensions, and coverage needed. The electrical contractor checklist helps organize the project details.
 English
 Spanish
 French
 Arabic
 Ukrainian
 Portuguese
 German
 Italian
 Russian
 Dutch